So if you haven’t seen my lukewarm review of the last router I bought (you can here) I was not entirely thrilled with it. Having previously acquired a Meraki MR18 for attending a webinar I began to wonder if it had any open source firmware for it. After a little bit of searching I found that hacker hero riptidewave93 has indeed found a way to install LEDE on the MR18! This post will be able my experience and tips on flashing my MR18 with OpenWRT/LEDE. To start you will need a UART serial cable, a few screwdrivers bits, and these files. For UART cable I used the KedSUM CP2101 which has a lot of good Amazon reviews. For screwdrivers unless you have a micro Torx number 8 you will need to get one, I bought this Jakemy set and have been very happy with it. The method I used it would be helpful to have a spare router but it is not totally necessary. If you do not have or do not wish to use a router you will need to make whatever machine you are using a DHCP server. Use this guide on setting up DHCP on a Linux system if necessary. The official guides I will be referencing are the OpenWRT guide, riptidewave’s personal blog, and riptidewave’s youtube video.
Unfortunately or fortunately depending on your outlook Meraki is no longer giving away the MR18, but now the MR33 with 802.11ac! As of now LEDE/OpenWRT has not been successfully ported over, our hacker hero riptidewave93 is working on it so if you want an OpenWRT powered MR33 you will have to sit tight. You can purchase a MR18 from Amazon here if you would like to flash it. There are benefits to both options, the MR18 is know to work, but the firmware may have been updated past the point were this method of flashing will not work. The MR18 is also not cheap, as of right now it’s $330, and for that price you can get some great routers that are already open-sourced firmware or much easier to flash. The MR33 may or may not be able to have OpenWRT for any number of reasons. So the choice is yours.
As another disclaimer although this worked for me and other it may not work for you. Do not blame me if you break your device following these instructions.
With all that out of the way let’s free this AP!

GNU/Linux to save the day!
Since I had firmware version 24.6 I will be using Method C on the openwrt forum.
First things first, you need to get to the console cable ports. Remove the rubber feet to reveal the 4 T8 screws, once you remove them you may have to do some fanagaling to get the back cover off. Once the cover has been removed you should see the 4 console pins in the upper right hand corner. I found it easier to remove the board from the cover by unscrewing the main screw between the Ethernet port and power supply and lifting the board slightly. Be careful if you do this though there are radio wires that are lightly connected to the board and if you are too rough it could disconnect them.

Once the console pins are free connect them like shown in the picture. Some sources say not to use the far left pin for fear it will burn out the board, but I had it plugged in for a while and it did not seem to affect anything. The order to connect is RX, TX, GND from the second pin from the left, and using the other pin for VCC if your console does not come up normally. Now open your favorite serial connection application and power on the AP and see if it works. The speed should be set to 115200 Baud. You should see the boot up process on the console, if not check all the settings again.
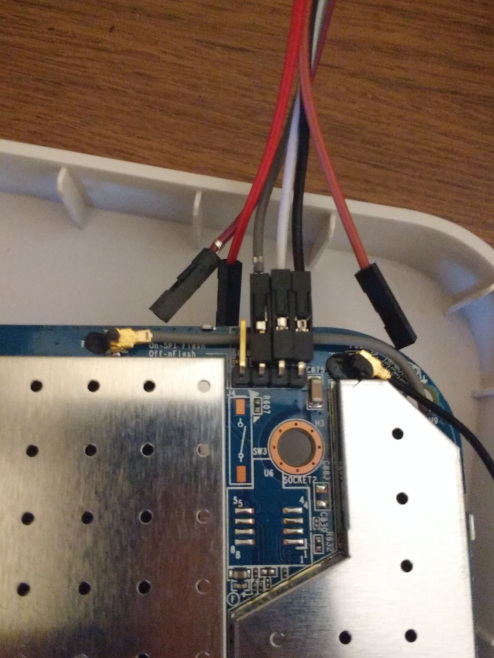
Grey: RX White: TX Black: GND
2. Hook up your MR18 to a router, and disconnect the router from the internet. DO NOT ALLOW THE MR18 TO TOUCH THE INTERNET DURING THIS PROCESS! This is important as the most reliable way to do this exploit is to have the MR18 use DHCP to get an IP on the same network as your personal computer.
It is important to not let the MR18 get to the internet, since Meraki will auto update firmware.
3. Hold the reset button on the MR18 for 10+ seconds. You should see the LED blink, and then turn off. Once the LED turns off you can stop holding the reset button. This does a “Level 2” reset and removes any configs from the access point.
I’m not sure this step is completely necessary, but I did it anyway.
4. From your personal computer that has UART wired to the MR18, plug into the same router the MR18 is using. Then, remember the IP address of your system. In this example, we will use 192.168.1.102.
also check to see if you can ping the AP from your workstation
5. Once the MR18 booted, start a HTTP server (on port 80) on your personal computer in the same directory as the firmware files. If you are running linux, this can be done using the below example:
wget https://servernetworktech.com/uploads/files/MR18-LEDE.tar.gz

tar xzvf ./MR18-LEDE.tar.gz

cd ./MR18-LEDE/

sudo python2 -m SimpleHTTPServer 80
python is probably the simplest way to go, be sure to also check your firewall rules to make sure outside systems can reach your webserver, especially on CentOS!
6. Once started, you can then load this image to the “part2” partition on the MR18. This is done with the following:
odm firmware part2 192.168.1.102:80/lede-ar71xx-nand-mr18-initramfs-kernel.bin
Note that the above command may timeout, depending at what state your router is during the boot process. If it times out or fails, just wait 60 seconds and try again. Normally the best time to run the command is when the LED on the MR18 is green or flashing orange.
Be sure to use the IP address of the computer that has the image, and that the web server is listening on port 80
7. Once complete, remove power from the Meraki MR18. Now that power is removed, in your UART session hold down “2” on your keyboard while applying power. This should now boot you into the initramfs image you just flashed to the MR18.
Once it boots you should notice a difference in the prompt, that means it has LEDE successfully installed the initramfs! Not done quite yet, but the most dangerous stuff is over.
8. Unplug the MR18 from your router, and directly wire your computer to it. Once wired, you should get a IP from the MR18.
Since LEDE is running on the AP now it should be running a DHCP server so you should be able to get an IP. If you used your local system as DHCP server instead of a router be sure to turn it off and reset the interface to accept DHCP. And if you do not get an address from the router you can set a static address on your interface and that should work as well.
9. Now that recovery is flashed, open a browser on your computer and navigate to 192.168.1.1. Once signed into LuCI, you can then flash the sysupgrade image lede-ar71xx-nand-mr18-squashfs-sysupgrade.tar.
You should find the Update firmware page under the administration tab on the homepage.
10. Once flashed, your MR18 should reboot and be fully running OpenWRT/LEDE!
Woot!
Configuration suggestions
I suspect if you are reading this blog then you probably have a few devices that are running on a wired connection. If that’s the case you may be hesitant to make the switch and I wouldn’t blame you. If you have only wireless devices you could just go ahead and plugin the Ethernet to your modem and be good to go! Just don’t forget to change the Ethernet zone from LAN to WAN. What I decided to do was use my old trusty TP-Link (also running OpenWRT) as the main router doing DHCP, and just use the MR18 for wireless. As seen in the diagram.
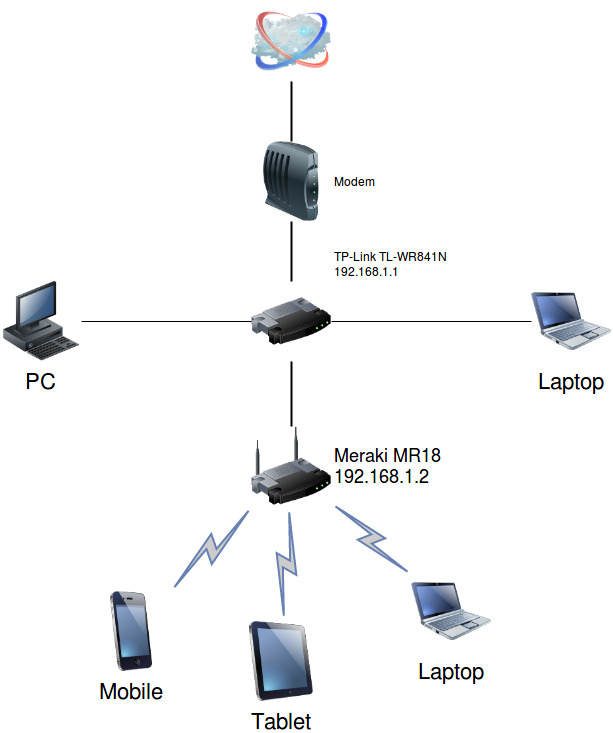
If you want to do something similar disable DHCP on the MR18 and change the IP address from 192.168.1.1 to something like 192.168.1.2 to avoid IP conflicts. After doing those 2 things my network runs great! You could also get a managed switch and use vlans and sub-interfaces to create a similar effect, but that would probably be a post of it’s own. Here is the final setup

Not Pictured: cable management
Thanks for reading and feel free to comment below if you have any questions.
Disclaimer: I used affilate links in this post. If you buy things from the links in this post I will get a small amount of money.

Workes great, thank you!
LikeLiked by 1 person
Thanks for reading!
LikeLike
Pingback: Upgrading Cisco Linksys EA3500 to OpenWRT/LEDE Step by Step | N00b security
Any further tips for the UART connection. Putty seems to just bounce when I hit open and fails to connect without any messafe
LikeLike
Hey Craig,
It could be a few things so we might need some additional info, check the Event Logs to see if there are any helpful events there. Here’s a few general tips.
1. Try moving the UART connector around the USB ports, especially if you have USB 2.0 and 3
2. Try running PuTTY in admin mode, this is normally not recommended but since it is hardware it could have some problems talking to it.
3. Try using some of the different connectors
4. If you think the problem is PuTTY try getting an old version.
5. If all else fails try installing Linux! (joke)
Let us know the results
LikeLike
Wow! Excelente! I Will try!
LikeLike
Not working anymore, odm command is now unrecognized. 😦
LikeLike
Hey Luke,
What version of firmware is the MR18 running?
LikeLike
25.20, I believe. As I understand, odm command was removed in 25.11.
LikeLike
Hey Luke,
SOrry to hear, I don’t believe there is a downgrade option in Meraki for firmware either. Let us know if you get it working!
LikeLike
Hi, when i try enter “odm firmware part2 192.168.1.10:80/lede-ar71xx-nand-mr18-initramfs-kernel.bin” i get unrecognized command logged to cloud servers. after is say
any idea what i need to do?
LikeLike
Hey Sanchezuk,
I believe the odm command has been depreciated in the latest MR18 firmwares 😦 . It does look like there is some older discussion here https://old.reddit.com/r/openwrt/comments/8hnrkh/meraki_mr18_its_latest_firmware_and_openwrt/?st=juunnamk&sh=6986ab43
That may be able to help.
LikeLike
Pingback: State of the Homelab, 2020 | N00b security